

BEAUTIFUL ORGANISER
IMITATION OF BOOKS
MATERIALS:-polystyrene sheet of 2 cm. thick-masking tape-x-ray film, Newsprint, paper mache glue, brushes: bristle flat and dry brush to paper, kitchen roll, Clear acrylic matte or satin-Paper Mache-gold strips and corner gold, cotton cloth, paper-Cola plush blue vinyl-acrylic, blue petal, burgundy, green, phthalocyanine, ocher and white cardboard tubes Square-asphalt-nut paste Trinchet
 Step 1:
Cut four rectangles of 29 x 23 cm. planzha styrofoam on a 2 cm. thick, three rectangles of 4.5 x 21.5 cm. for the base, and six rectangles of 4.5 x 29 cm. for leaves and spines.
 Step 2:
Cut the cardboard tubes Trinchet in half. Cut back to 29 cm. long. Taped with masking tape cardboard tube half the book's cover.
 Step 3:
Wrap masking tape styrofoam boxes that go on the sides and base of the books.
 Step 4:
Cut strips of newspaper. Support them in the image plate. Smear of glue for paper mache. Cartapesta cover of the book covering the entire surface.
 Step 5:
Cartapesta the inside with bits of newspaper, just up in different directions to cover everything.
 Step 6:
Repeat again the same process as in the previous step, both the lid and on the inside. Supporting a telephone directory or a heavy element to prevent the arch is dry. Allow to dry.
 Step 7:
Line the inside of the lid with blue plush paper. Stick it with vinyl glue. Allow to dry.
 Step 8:
Take the rectangle that will cover half of the book. Cartapesta with two layers of newspaper. Let it dry with a weight up. Once dry, fit the back with masking tape.
 Step 9:
Arm another piece like the one made in steps two and three. Cartapesta the same way as in the previous steps. Let it dry. Then line the inside with plush blue. Supporting and arming the second book, setting it with pieces of masking tape.
 Step 10:
Finish the assembly of the organizer, placing the last book, that is, the cover with the back cartapesta also lined with fleece and dry. Adjust with masking tape. Use the brush to cartapesta with strips of newspaper and glue to paper mache. Joining the three books as well. Allow to dry.
 Step 11:
Load a brush with acrylic matte or satin varnish and go through the book cover. Supporting the role of kitchen roll and crumpled by hand to form texture of leather. Go back over the paper coating. Allow to dry. Do the same in the other lid.
 Step 12:
Paper Mache Roll with a rolling pin. Rests on the backs of books. Cut off the excess with scissors.
 Step 13:
Take a piece of x-ray film. Support it over the pasta. Press until smoothing evenly and adhere. Allow to dry.
 Step 14:
Place paper mache paste on the sides. Mark lines with a ruler or square. Allow to dry.
 Step 15:
Paint the backs of the books with acrylics. One with Burgundy, another Phthalocyanine Green with a hint of white. Load the brush bristles. Download the surplus on paper. Appealing to the dry brush technique to get through the back of the green book.
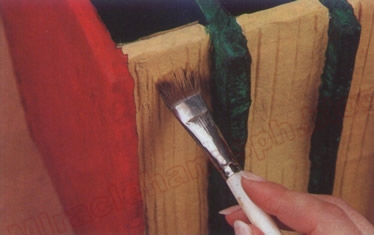 Step 16: Ochre acrylic paint with the leaves of books. Allow to dry.
 Step 17:
Mix acrylic with a hint of Burgundy and white-with dry-brush technique to pass through the relief of the burgundy cover and spine. Allow to dry.
 Blue Mix with a pinch of white acrylic and, with dry-brush technique to go through the blue book cover and spine. Load the brush with water. Get the excess over a cloth. Half black bear sows and parsed by a role to melt. With the float technique, pass through the joints of the loins. Let dry
 Step 19:
Cut strips of golden spine width. Stick them with glue on the backs of books. Do the same process with gold corners.
 Step 20:
Load a brush with asphalt paste. Going through the pages of books. Remove excess with a cotton cloth.
FINISHED MODEL

IMITATION OF BOOKS
MATERIALS:-polystyrene sheet of 2 cm. thick-masking tape-x-ray film, Newsprint, paper mache glue, brushes: bristle flat and dry brush to paper, kitchen roll, Clear acrylic matte or satin-Paper Mache-gold strips and corner gold, cotton cloth, paper-Cola plush blue vinyl-acrylic, blue petal, burgundy, green, phthalocyanine, ocher and white cardboard tubes Square-asphalt-nut paste Trinchet
Cut four rectangles of 29 x 23 cm. planzha styrofoam on a 2 cm. thick, three rectangles of 4.5 x 21.5 cm. for the base, and six rectangles of 4.5 x 29 cm. for leaves and spines.
Cut the cardboard tubes Trinchet in half. Cut back to 29 cm. long. Taped with masking tape cardboard tube half the book's cover.

Wrap masking tape styrofoam boxes that go on the sides and base of the books.

Cut strips of newspaper. Support them in the image plate. Smear of glue for paper mache. Cartapesta cover of the book covering the entire surface.
Cartapesta the inside with bits of newspaper, just up in different directions to cover everything.

Repeat again the same process as in the previous step, both the lid and on the inside. Supporting a telephone directory or a heavy element to prevent the arch is dry. Allow to dry.

Line the inside of the lid with blue plush paper. Stick it with vinyl glue. Allow to dry.

Take the rectangle that will cover half of the book. Cartapesta with two layers of newspaper. Let it dry with a weight up. Once dry, fit the back with masking tape.

Arm another piece like the one made in steps two and three. Cartapesta the same way as in the previous steps. Let it dry. Then line the inside with plush blue. Supporting and arming the second book, setting it with pieces of masking tape.
Finish the assembly of the organizer, placing the last book, that is, the cover with the back cartapesta also lined with fleece and dry. Adjust with masking tape. Use the brush to cartapesta with strips of newspaper and glue to paper mache. Joining the three books as well. Allow to dry.
Load a brush with acrylic matte or satin varnish and go through the book cover. Supporting the role of kitchen roll and crumpled by hand to form texture of leather. Go back over the paper coating. Allow to dry. Do the same in the other lid.
Paper Mache Roll with a rolling pin. Rests on the backs of books. Cut off the excess with scissors.
Take a piece of x-ray film. Support it over the pasta. Press until smoothing evenly and adhere. Allow to dry.
Place paper mache paste on the sides. Mark lines with a ruler or square. Allow to dry.

Paint the backs of the books with acrylics. One with Burgundy, another Phthalocyanine Green with a hint of white. Load the brush bristles. Download the surplus on paper. Appealing to the dry brush technique to get through the back of the green book.
Mix acrylic with a hint of Burgundy and white-with dry-brush technique to pass through the relief of the burgundy cover and spine. Allow to dry.
Cut strips of golden spine width. Stick them with glue on the backs of books. Do the same process with gold corners.

Load a brush with asphalt paste. Going through the pages of books. Remove excess with a cotton cloth.
FINISHED MODEL


0 Comment :
Post a Comment